
How to transfer photos from iPad to Mac in easy ways
No matter you lost a unsaved Word page, or accidentally deleted Word documents on your Mac, Microsoft have options to help you recover your Word files. Here's how.
To recover unsaved or lost Word document on Mac:

Microsoft AutoSave and AutoRecover features always work in recovering unsaved Word docs on Mac.
Imagine this: You're working on a Word paper on your MacBook. All of sudden, your laptop restarts, the document you're working disappears without saving, nowhere to be found. Is there a way to get the unsaved Word document back?
Losing an unsaved Word file when your Mac or the app suddenly crashes can be very annoying, especially if you're working with an important essay. But don't worry. Here, we'll take you through every possible approach to recover unsaved Word document on Mac, or recover lost or deleted Word files on your computer.
Table of contents
Microsoft knows how painful it's when you lose an unsaved Word doc file on Mac, and introduces an AutoRecover feature to help you recover files automatically while you're working with a Word document. This can be very useful when you're suffering from a power outrages or system crash.
However, there is no visible folder in Mac available for you to access through Finder to restore unsaved Word files. Instead, you will have to use the Go To Folder tool and enter the full path to get into it.
How AutoRecover works to recover a Word file
When there's an AutoRecover file available to use, even if you encounter an unexpected shutdown or similar things before saving your Word file, AutoRecover will typically attempt to recover you work by opening the available AutoRecover file automatically the next time that you open the Word app.
If you really need to recover your unsaved Word file, you should immediately save it before closing or editing it. After that, the unsaved file will be gone forever. Office assumes that everything goes well and won't keep the AutoRecover file anymore.
Why can't I see an AutoRecover file when re-open the Word app?
Note, the AutoRecover feature in Word can only help you recover unsaved files when you save the document at least one time. However, if you manually save your file already and won't make any changes, the previous AutoRecover files will be removed automatically.
How to recover an unsaved Word document on Mac
To find any AutoRecovered files on your Mac, you will need to use Go To Folder tool.
1. Open Finder from the Dock, and click Go > Go To Folder (or press SHIFT + COMMAND + G).
2. Enter the specific folder path, replace username with your username.
/Users/

3. Open the AutoRecovery folder, your unsaved Word documents will start with the words "AutoRecovery save of."
4. Find the AutoRecovery file you want to recover, double click it to open in Word for Mac.
5. Select the File menu and choose Save As.
6. Give it a new name for the Word document and specify where it will be stored on your Mac.
7. Click the Save button.
For future reference, you may open Word app, select Preferences, and then click Save. When a Save AutoRecover info box opens, change how frequently you want to save AutoRecover files while working with Word.
Want to get a quick access to your AutoRecover folder in Word? Microsoft also gives you option to change the default path for saving AutoRecovery files: Preferences > Personal Settings > File Locations > AutoRecover files > Modify, from where use a new location on Mac to automatically save files, followed by Open.
Also: How to transfer photos from iPhone to external hard drive
While AutoRecover allows saving Office documents locally, Microsoft AutoSave is a cloud-based storage solution. Have you enabled AutoSave feature and saved your Word files to OneDrive? If yes, your unsaved Word document files might be synced in the cloud. Once you lost an unsaved document, you can sign in to OneDrive with your account and select the Word file you want to restore to an earlier version.
What is Microsoft AutoSave
AutoSave in Microsoft Word is a feature that automatically saves your document as you work. This feature is available for Microsoft 365 subscribers and is enabled by default for files stored to OneDrive, OneDrive for Business, and SharePoint Online.
How AutoSave works to store documents
To save your Word files to OneDrive automatically, open Word for Mac app, and turn on AutoSave switch in the upper left corner of interface (Starting in Office 2019, the traditional save button is displayed next to it). In the opening dialog, confirm your decision that you will save Word files to OneDrive.
AutoSave saves your documents every few seconds, and keeps versions history of your document for unsaved Word document recovery if necessary.
How to recover an earlier version of an unsaved Word file you lost
1. Sign in to OneDrive with your Microsoft account or your work or school account.
2. Right-click the document you want to restore.
3. Select Version History.
4. In the Version History pane, select the ellipses (...) next to the version of the Word document to be restored.
5. Click Restore.
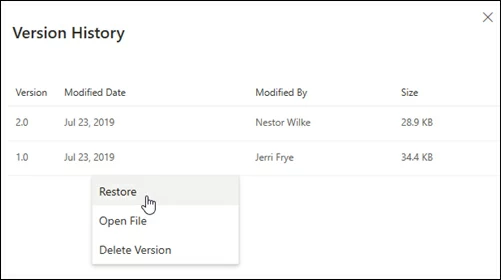
It also works with other files types such as PDFs, videos, photos, and Microsoft 365 files, making it possible to restore deleted individual files at ease.
Also: How to get into a locked iPhone
Even you don't have AutoRecover or AutoSave feature enabled to restore the Word documents on Mac, you may check your Mac's Tmp folder, also known as temporary folder, which stores files created by macOS and applications temporary while a task is ongoing. If you're lucky enough, you may find your unsaved Word file there.
To find and recover lost Word files on Mac, follow these steps:
1. Launch Terminal from Utility folder on your Mac.
2. When Terminal window opens, enter open $TMPDIR to access TMP folder.
3. Find the "TemporaryItems" folder and open it.
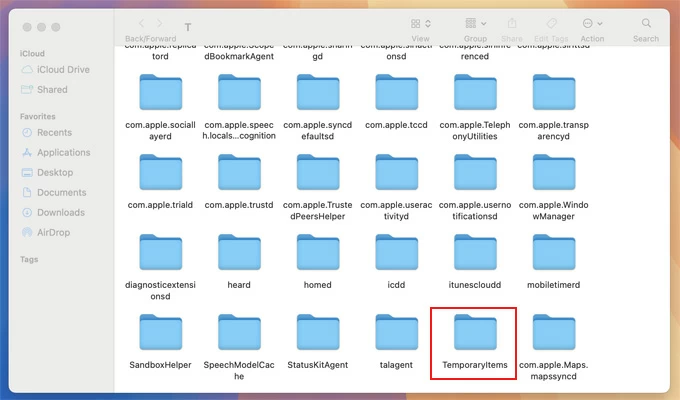
4. If you find the Word file you need to recover, right-click.
5. Click "Open with..." and select Microsoft Word.
6. In Word for Mac, click on File > Save As to save the desired Word doc to your local folder.
It's also possible to do an unsaved Word document recovery on Mac within Word app if you have previous versions available.
1. Open the Word file you want to restore the unsaved version.
2. go to File > Browse Version History.
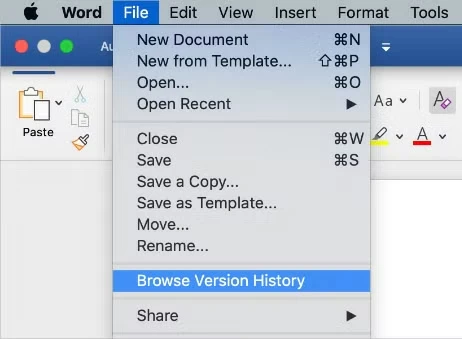
3. Select the previous version you wish to recover from the list.
4. Select Restore.
It's a heart-sinking moment when you realize that you haven't saved the Word document and it's gone. What to do if you accidentally delete a Word file that you don't mean to. All is not lost, though, as there may be a few options to recover deleted Word documents on Mac.
Also: How to recover permanently deleted photos on iPhone without backup
If you are lucky, you won't have deleted your Word files at all. Just like your iPhone, macOS comes with a Trash bin out of the box, meaning that even if you completely deleted a document in Word for Mac, it may still be recovered in Trash before you empty the folder.
To check your Trash folder, click the Trash icon from the Dock and browse through recently deleted files. If you want to recover deleted Word documents:
1. Right-click on one Word file, or hold down the Command key while clicking on each document to select multiple items.
2. Click the Put Back option.
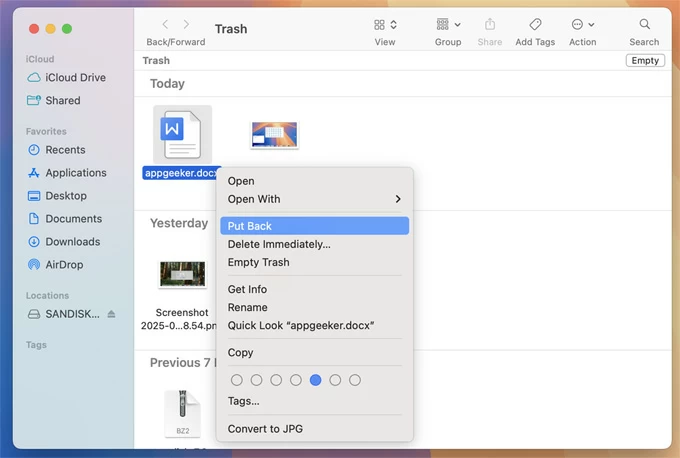
3. You can also drag and drop the files to your desktop or a folder to recover Word docs.
If you don't have any luck, then try using Mac Data Recovery, a dedicated program for Mac users to recover different types of data files, including Office Word files from computer hard drive, USB flash drive, external hard drive, SD card, camera, Trash/ Recycle bin and any other storage media.
Simply select your file type, specify the drive to be searched, and it scans the drive thoroughly for the deleted or lost files. A report with categories tells you what it's found, and you can recover any of them in seconds.
Even if you deleted your Word documents from your Mac and can't find in Trash, there is still a chance these files haven't yet been overwritten in macOS. So, act quickly as soon as possible.
The instructions below walk you through the entire process of using Mac Data Recovery to recover a Word document on Mac.
Step 1: Run the program
Launch it on your Mac after installation. You should see a simple and easy-to-use interface.

Step 2: Choose Document and what drive to scan
Now, choose the type of data that you have deleted. Here you should tick the check box next to "Document" option.
Then, select which drives on your Mac you wish to scan. If you do know which folder you deleted your Word docs, you may click the "Select Folder" at the bottom of the interface, in the opening dialog select your folder; you may also choose to check "Macintosh HD" to scan your entire Mac drive.
Step 3: Scan to search for deleted Word documents
As soon as you press the "Scan" button at the bottom right corner, the program will start a quick scan on your selected drive to search for lost Word files.
While the scan is in progress, a dual-paned window will open, showing you a list of files being found.

All Word docs found will be sorted and listed in "Document" category on the left pane. You may click it to expand the list and see more details there.
Note, your files will be divided into two sub-categories: DOC and DOCX.

Step 4: Recover lost Word documents on Mac
Select the desired files and click "Recover" to get lost Word docs back.
In addition, You can try to restore a lost Word document with Time Machine function If you enabled it before on your Mac. Time Machine outweighs Trash folder, as it can retrieve files that haven even been permanently erased.
1. Open Word for Mac.
2. Connect the disk that's used to save the backup files created by Time Machine to your Mac.
3. Open Finder, click the Time Machine icon, and then Enter Time Machine.
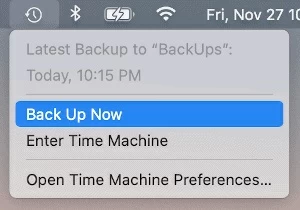
4. Browse through Time Machine backup copies to find the one that includes the deleted Word docs.
5. Select the document (or documents) , then click "Restore" button.
6. The doc file(s) will be restored to its original location.

Also: How to spoof location on iPhone
If you get a damaged document in Word for Mac, follow these tips to troubleshoot it.
1. Open Word for Mac, go to Preferences.
2. Select General under Authoring and Proofing Tools.
3. Tick the Confirm file format conversion at Open box. Close it.
4. Click File > Open.
5. On the Open menu towards the bottom right select Recover Text.