How to Restore Photos from iCloud Backup

Whether you prefer to transfer iPhone photos to MacBook Air wirelessly or with a USB cable connection, you can find the solution you need in this guide.

![]()
There are many available wireless and wired methods for you to transfer images from iPhone to MacBook Air.
Users often transfer photos from iPhone to MacBook Air or Mac for reasons such as freeing up space on iPhone, photo backup, or pursuing better image processing capabilities. There are many ways available for transferring photos from an iPhone to a MacBook Air, including importing your iPhone photos to your MacBook using a USB cable, or wirelessly transferring them via AirDrop or iCloud.
This article will walk you through how to transfer photos from iPhone to your MacBook Air, allowing you to save and process your precious memories in an efficient way. Among them, to transfer a large number of photos to your MacBook Air with original quality at once, you can try iPhone Data Transfer for greater flexibility in the photo transfer.
Table of Contents
You can transfer photos from your iPhone to your MacBook Air by connecting the devices with a compatible data cable, primarily utilizing the Photos app, iPhone Data Transfer, and Image Capture tools. If you're going the opposite way with a Mac computer, How to transfer photos from Mac to iPhone is what you need.
Photos app helps users easily manage, browse, edit, and share photos on iPhone, iPad, iPod touch, Mac and MacBook. It comes pre-installed on your iPhone and MacBook Air, providing a convenient option for importing photos from an iPhone to MacBook Air.
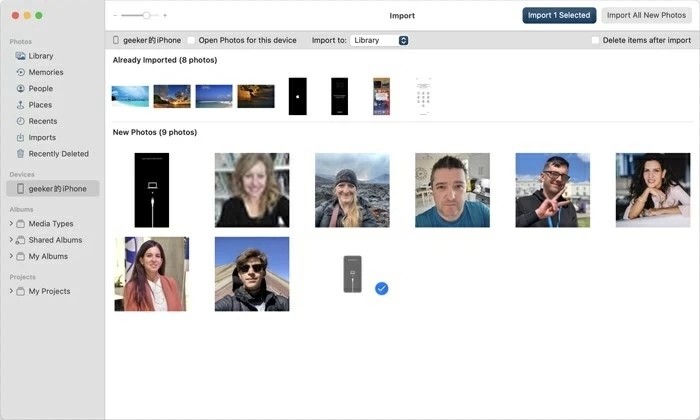
1. Connect your iPhone to your MacBook Air using a suitable USB cable.
2. Grant access. If your MacBook Air asks you to allow the accessory to connect, click "Allow." On your iPhone, if prompted, tap "Trust" and enter your passcode to authorize the connection.
3. Run Photos app on MacBook Air and locate your connected iPhone under Devices section.
4. Select a destination to save the imported photos. Click on the "Import To" / "Album" drop-down menu at the top and select or create an album.
5. Manually choose the photos you want to transfer in the Import window and then click "Import Selected." Or you can use the "Import All New Items" option to copy all photos from your iPhone Photo Library to MacBook Air.
6. The transferred photos can be viewed in the Imports or Library tabs in the left-hand sidebar.
Tip: After the transfer is complete, you can check "Delete items after import" to remove the imported pictures from your iPhone and save space.
It's worth noting that this method is suitable when you haven't enabled iCloud Photos and want to transfer all or part of your pictures to your MacBook Air. Within the Apple ecosystem, iCloud Photos is deeply integrated with the Photos app. To prevent the Photos app from automatically downloading iPhone photos to the MacBook Air, you can temporarily disable iCloud Photos before transferring your photos.
If you want to get complete photo library off the iPhone to MacBook Air's any folder for saving, then iPhone Data Transfer is your best helper. Besides completing batch photo transfer with high-speed, it can also keep the original resolution of all your photos. With this practical software, you can transfer all photos to MacBook Air from your iPhone, or selectively transfer specific photos from your iPhone's Photo Library, Camera Roll or other apps.
It facilitates bidirectional file transfer and management between iOS devices and computers, including photos, videos, music, broadcast, etc., enabling you move your photos and videos from iPhone to MacBook Air or from MacBook Air to iPhone.
1. Download and launch iPhone Data Transfer on your MacBook Air. Then unlock your iPhone and connect it to your MacBook Air.
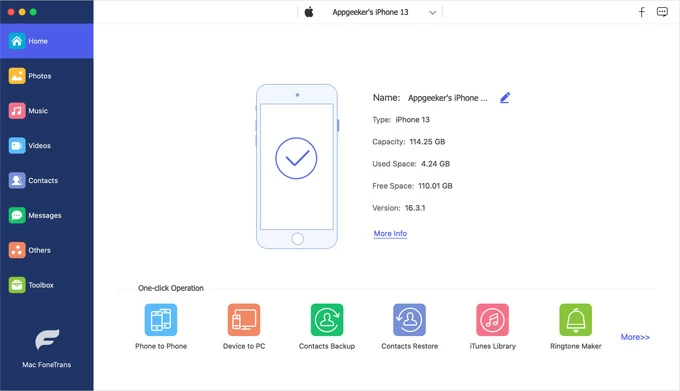
2. Navigate to "Photos" button and pick your desired photos. All the photos on your iPhone will be categorized into different albums for you to select them purposefully. You can check your favorite images one by one or use "Check All" option to select entire photo library.

3. Start the photo transfer. Click the "computer" icon at the top and choose a target folder to keep your photos in the pop-up window, then click "Open" button at the bottom right to add photos from iPhone to your MacBook Air.

If you have another Windows PC, you can follow our other guide on How to transfer photos from iPhone to PC without iTunes.
As a small and lightweight program built into the MacBook Air, Image Capture makes it easy to browse and manage images and videos from your digital devices. Here's how to transfer your photos from iPhone to your MacBook Air laptop for safekeeping using Image Capture:
1. Use a USB cable to plug your iPhone into your MacBook Air.
2. Go to Finder > Applications to run Image Capture. Or search it via Spotlight.
3. Click your iPhone in the left "DEVICES" section.
4. Preview thumbnails of photos and videos from the iPhone and select the items you need.
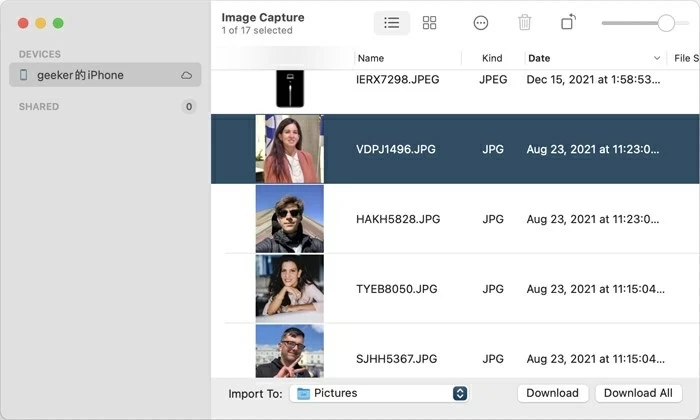
5. In the "Import to" section in the bottom left corner, you can set which folder on your MacBook Air to save these photos to.
6. Hit "Download" or "Download All" in the lower right to download the photos to your chosen folder.
Note:
To avoid transfer failure due to data cable problem, actually, cloud services and other Apple-developed wireless transfer tools can meet your needs for wirelessly sharing photos from the iPhone to the MacBook Air.
With cloud computing and distributed storage technology, iCloud Photos allows you to sync photos and videos across devices using the same Apple account. If you enable iCloud Photos on your iPhone and MacBook Air, your iPhone will automatically upload photos to iCloud, and then iCloud will sync the iPhone photos to your MacBook Air.
Although iCloud provides secure and encrypted services for data backup and syncing, you need to subscribe to an additional space plan when you run out of the 5GB of free space.
1. Enable iCloud Photos on iPhone. Head to Settings > [your name] > iCloud > Photos, and switch "Sync this iPhone" to On.
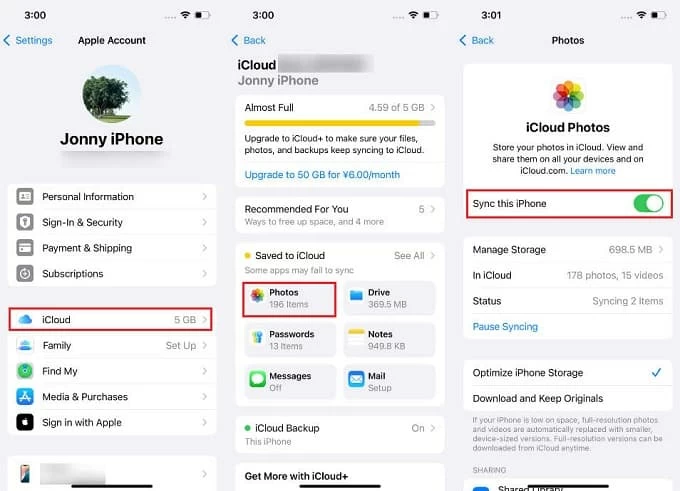
2. Launch Photos app on your MacBook, then navigate to Photos > Preferences / Settings in the top left menu.
3. Choose "iCloud" tab in the pop-up window and check "iCloud Photos."

Wait for the photos to sync to your MacBook Air, and then you can view the photos uploaded from your iPhone to iCloud in the Library tab. However, iCloud Photos will sync changes made to photos using the same Apple ID, including deletions, edits, and more. Therefore, you can copy and paste these photos to another folder to preserve their original versions.
Read more: How to recover photos on iPhone without backup
As a wireless transfer technology developed by Apple, AirDrop can be used to share files, photos, audio and video, etc. between macOS, iOS or iPadOS devices. But before you send photos and videos from iPhone to MacBook Air, you need to meet some conditions:
1. Enable AirDrop on iPhone. Swipe the screen to access the Control Center, long-press the network tile, then tap the "AirDrop" and select "Contacts Only" or "Everyone."
2. Turn on AirDrop on MacBook Air. Navigate to Control Center icon in the taskbar at the top right of the screen, make sure AirDrop is open and "Contacts Only" or "Everyone" is selected.
3. Open the Photos app on your iPhone and select your preferred items. To share more than one picture, tap "Select" in the upper right corner to pick multiple photos.
4. Tap the "Share" icon in the lower left corner, then tap the "AirDrop" icon and select your MacBook Air as receiving device.
![]()
5. If necessary, you'll need to click "Accept" on the MacBook Air to get the AirDropped image.
This method is ideal for instantly sharing a small number of photos from iPhone to MacBook Air. By default, you can access the AirDropped photos in the Download folder.
Another way to upload photos from iPhone to MacBook Air wirelessly is to utilize Cloud-based services, such as Google Drive, Dropbox, OneDrive, Amazon Drive, etc. Here takes Dropbox as an example to show you how to move photos from an iPhone to a MacBook Air without USB connection.
1. Download the Dropbox app on both your iPhone and MacBook Air and sign in with the same account.
2. Open Dropbox on your iPhone, tap on the "+" icon at the bottom of the screen and select "Upload Photos."
3. Choose the photos you wish to upload from your iPhone's photo library and tap "Upload."
4. Run Dropbox on your MacBook Air and locate the folder where you uploaded your photos.
5. Select the photos and click on the "Download" button to download the selected photos to your MacBook Air.
Further reading: How to transfer music to iPhone without iTunes
When it comes to moving photos from your iPhone to your MacBook Air, the choice between wired and wireless methods can feel like a tug-of-war between speed and convenience.
If you're looking for a stable and fast way to transfer your pictures, especially a large photo library or numerous images, the preferred method is wired transfer options like the Photos app, Image Capture, and third-party software. A direct physical connection provides a more stable transfer environment with reduced latency, unaffected by network speed.
And for users who prioritize convenience and flexibility in transferring photos from their iPhone to their MacBook Air, wireless options led by airdrop and iCloud allow for remote and instant data transfer, though they are limited by network speed and signal strength.
When your photos fail to transfer from iPhone to MacBook air, you can follow the suggestions below to troubleshoot the problem.
1. USB connection problem: Use an original, well-functioning USB cable that is compatible with both your iPhone and MacBook Air's ports. Otherwise, you may need an additional adapter.
2. Available space issues: When using iCloud or other cloud services, ensure there is enough storage space to accommodate your photo library and complete the transfer.
3. Internet connection problem: Switch your Wi-Fi or cellular data to ensure a strong and stable network connection to avoid transfer interruptions.
4. Device trust issues: Make sure that a trust relationship has been established between iPhone and MacBook Air so that MacBook Air can detect your iPhone.
Conclusion
Transferring photos from iPhone to MacBook Air can be done easily by the different methods mentioned above, but it is important to choose the method that best suits your needs and remember to always backup your photos to keep your data safe.