
How to Recover Permanently Deleted Photos on iPhone

Looking to transfer your iPad photos to your computer for local access? Check out these 7 ways for wired or wireless photo transfer, working for both Windows PC and macOS!


Explore all possible ways for iPad-to-computer photo transfer, working for both Windows PC and macOS users.
Transferring photos from iPad to computer is an excellent way to free up device space and back up your precious memories, ensuring seamless local access to your iPad photos on a Windows PC or Mac without hassle.
This guide covers every efficient method to transfer photos from iPad to computer. Whether you prefer wired or wireless transfers, these reliable solutions enable quick and easy iPad photo transfer to computer (Windows PC & Mac) with minimal effort, applying to all iPad models, including iPad Air, iPad Pro, and iPad Mini.
Whether you're using a Windows PC or Mac, iPad Data Transfer enables selective and bulk photo transfer from iPad to computer or vice versa in simple clicks.
Whether you're looking to move all or just a selection of your iPad photos to a Windows PC or Mac, the all-in-one tool iPad Data Transfer can be your top choice.
It's compatible with all Windows and macOS versions, enabling users to selectively transfer photos and videos from iPad to computer in simple steps. Whether you want to import your entire Photos Library / Camera Roll or move individual pictures, videos, and albums, it lets you transfer your iPad photos back and forth flexibly without any quality loss.
Plus, it has a built-in HEIC Converter that can convert iPad pictures to standard JPEG and PNG formats, offering wider compatibilities especially if you're transferring photos to a Windows PC.
Supporting every iPad model and version, here's how to transfer photos from iPad to PC/Mac without iTunes or iCloud:
Step 1. Open iPad Data Transfer on your computer. It works for both Windows and macOS.
Step 2. Connect your iPad with a suitable USB cable. If asked, enter your iPad passcode and allow your device to trust this computer.

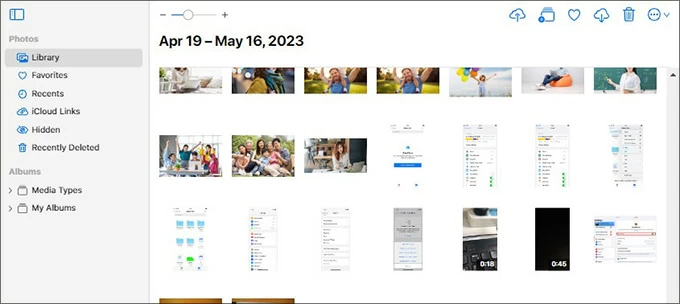
Step 3. Select Photos from the left-side menu. From there, you have full access to your entire iPad Photos Library — preview and select all pictures you wish to transfer to your computer.

Step 4. Transfer iPad photos to computer. Click the computer icon at the top and select Export to PC; when prompted, pick a local folder to save the transferred iPad photos on your computer.

To free up space, you can choose to delete original photos on iPad after transferring them to your computer. Additionally, this tool offers a one-click shortcut to move photos from your iPad to computer all at once, available for both Windows PC and Mac machines.


This will transfer all iPad photos to your computer for local backup, viewing, and sharing. It also helps if you'd like to access your iPhone photos on your PC or Mac in their full resolution.
For Windows users, there are two native tools making iPad photo transfer effortless — the Windows Photos app and File Explorer.
Before iPad-to-computer photo transfer:
The Photos app preinstalled on Windows 10/11 offers a user-friendly way to import photos from iPad to PC directly via a USB cable. With a streamlined interface, it lets you view and manage all photos on your computer in one place. For selective photo transfer from iPad to PC via Windows Photos app, here are the steps to follow:
1. Connect your iPad to computer using a USB cable. When required, unlock your iPad and tap Trust or Allow on the prompt. Get help if you forgot your iPad passcode.
2. Run Photos app from Windows Start menu if it doesn't open automatically. You may press the Windows key and type Photos in search bar to open it.
3. Click Import button in the upper-right corner on Windows Photos app.
4. From the expanded menu, select From a USB device to choose your iPad.
5. Select new or all iPad photos that you want to import to your computer. If all new pictures are checked by default, you may deselect the ones you don't want.
6. Click the Import button and select a local computer folder as destination.
7. Confirm Import X items option to start transferring.
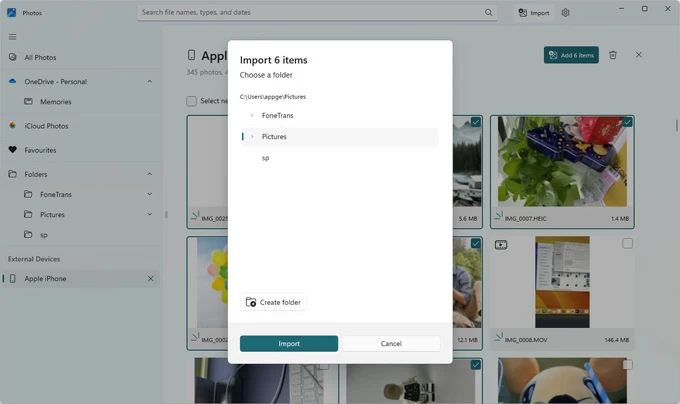
If you're running out of storage, check Deleted original items after import to free up some space on your iPad. Once done, open the picture folder on your computer for all imported iPad photos.
Another cable-based way for transferring iPad photos to Windows PC involves the use of File Explorer. This approach provides direct access to your iPad's DCIM folder, allowing you to manually browse, select, and copy photos from iPad to computer folder.
However, note that your iPad pictures will be organized in monthly folders rather than maintaining your original album structure. It can be time-consuming to locate specific images if you're working with a large photo library. Steps to move photos from iPad to computer via File Explorer:
Alternatively, you may press Ctrl + C to copy the iPad photos and use Ctrl + V to paste them in a PC folder. It also allows you to drag and drop the iPad photos to your computer directly.

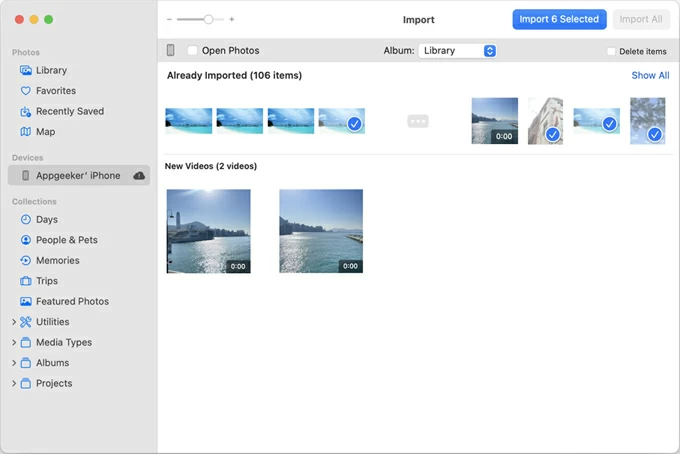
Transferring photos from iPad to Mac can be easy as they're both included within Apple's ecosystem. The built-in Photos app on macOS ensures you to import photos and videos from iPad quickly via a USB cable connection. The process is simple and straightforward. Here's how you can transfer all or selected photos from iPad to computer using Mac Photos app:
If necessary, check Delete items after import to free up iPad storage. For the pictures you delete accidentally, here's a separate guide on how to recover photos from iPad.
In addition to the wired transfers, there are a few wireless options that make iPad-to-computer photo transfer easy and efficient.
With a network connection, iCloud Photos enables automatic syncing of your iPad photos across Apple devices and Windows PCs — your entire Photos Library will be stored and kept updated in iCloud, making it easy to download iPad photos to your computer wirelessly.
To transfer iPad photos wirelessly via iCloud Photos, connect your device and computer to the same Apple ID, and ensure there's sufficient iCloud storage for wireless photo transfer from iPad to PC / Mac. The steps vary, depending on which OS your computer is using.
Be aware that iCloud offers 5 GB of free cloud storage in total. If there are thousands of pictures and videos in your library, consider expanding the storage by upgrading to iCloud +.
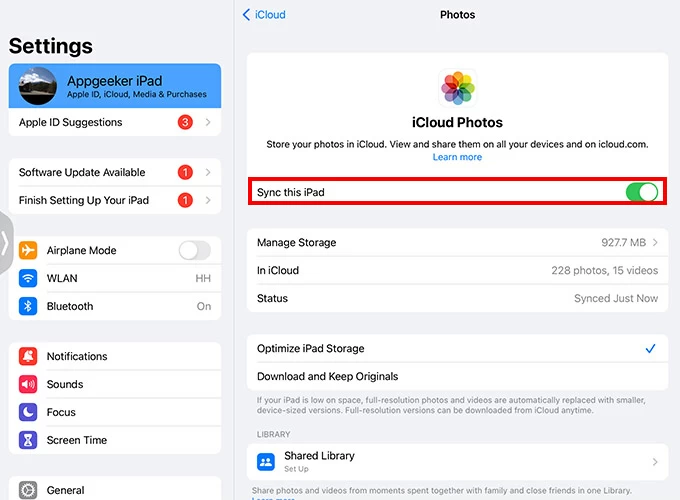
Enable iCloud Photos on iPad
This will upload entire iPad Photos Library to iCloud and sync them with other devices.
For Windows PC: Download iPad photos via iCloud for Windows
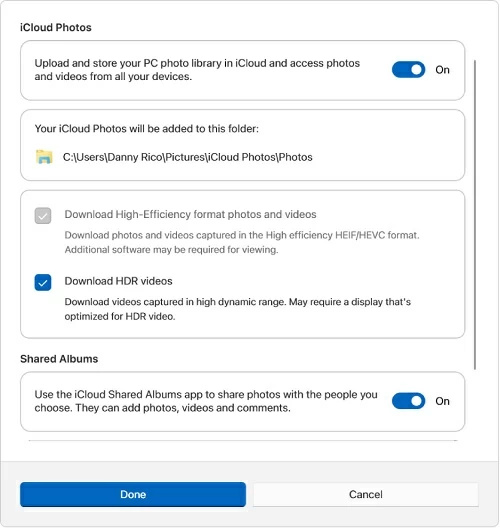
If you're using iCloud for Windows 14.2 or later, it's optional to choose Download High-Efficiency format photos and videos or Download HDR videos on your computer.
TIP: Generally, iCloud photos and videos are stored in C:\Users\[user name]\Pictures\iCloud Photos\Photos. You may open the folder to access the iPad photos on your PC.

For Mac: Get iPad photos from Photos app
Download iPad photos and videos from iCloud.com
Whether for Windows or macOS users, it's a straightforward process to download iPad photos to computer by visiting iCloud.com.
Once completed, all your wanted iPad photos will transfer to your computer for seamless access, backup, and future viewing and sharing.
Note: When iCloud Photos is enabled, any photo changes and deletions you make on your iPad will sync with your computer automatically.
Another Apple-supported way to share photos from iPad to macOS computer is by AirDrop. It's best for quick photo transfers with no quality loss, particularly when sending just a few pictures and videos. Put your iPad and Mac near each other within Wi-Fi and Bluetooth range, here's how:
Step 1. Turn on AirDrop.

Step 2. Transfer photos on iPad to Mac.

Step 3. Accept AirDrop photos on your Mac.
Using email is also a quick and direct way for sending photos from iPad to computer. However, it may not be available if you have a large number of photos and videos to move.
Once the iPad photos are transferred to computer, feel free to access them on your PC or Mac for local viewing and sharing. If you still have troubles, check out the followings:
Q1. Can I transfer my iPad photos to a Windows PC?
Yes, there are multiple ways to transfer photos from an iPad to a PC, working for both Windows 11 and Windows 10:
Q2. How can I transfer my photos from my iPad to computer without a cable?
If you're using a macOS computer, simply turn on the AirDrop and share pictures from your iPad wirelessly. For Windows users, iCloud Photos serves as a wireless option for cross-platform photo syncing without needing a USB cable.
Q3. Why can't I transfer photos from my iPad to my computer?
When importing photos via a wired connection, make sure to use a suitable USB or Lightning cable and allow your Apple device to sue this computer.
For wireless photo transfer via iCloud or other cloud services like Google Photos or Dropbox, ensure that you're signed in with the same account on both platforms and that there's enough storage available.